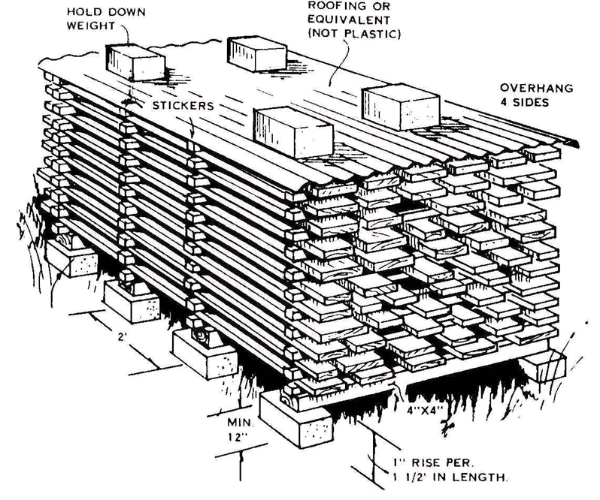
1
Foundation
Support every 4 feet with stickers lined up with foundation.
2
Stickers
In-between each course or layer of boards for good air circulation.
3
Cover
Protect top from sun and rain. Keep sides open for good air circulation.
4
Time
Hardwood = one year per inch of thickness. Softwood = months
Air Drying Lumber
For exterior or construction uses, best results can be obtained by air drying lumber. The degree of wetness in wood is called moisture content, and it’s expressed as a percentage. A moisture meter is the most reliable means of determining moisture content. Depending on your particular area air drying can bring the moisture content down below 7% making your material suitable for interior cabinet work and furniture. This process is easy and free.
Green lumber should be stacked on stickers as soon as possible after sawing. This improves air circulation between the boards, speeds drying and prevents discoloration. Applying an end sealer to the boards will reduce splitting and saves as much as 10% of the lumber value.

Properly stacked lumber dries quickly in warm, dry weather. Softwoods like pine and cedar will air dry to suitable moisture content in as little as 6 weeks during the spring and summer months. Hardwoods like Maple, Oak and Walnut will dry in 6 -12 months. Little or no air drying takes place in wet damp weather.
This illustration shows a properly stacked pile of green lumber. The “stickers” (1″ X 1″) and top weights should be aligned vertically and placed about 2 to 4 feet apart.
Cover the top of the pile with a tin sheet with overhang on all sides. Leave a space between the cover and the lumber pile.
According to the U.S. Forest Service’s Forest Products Laboratory in Madison, Wisconsin, it takes 1″-thick green boards from 45-60 days to air dry to 15-20 percent moisture content in sunny, temperate, not-too-humid weather. If you live where it’s colder and damper, count on more time. Inside a garage or barn the drying process can prove slower, taking three or four months before the wood reaches its optimum moisture content and can be worked. But achieving workable stock means starting with a proper stack.
Things to remember about drying wood
Drying your own wood can be great, if you follow this advice:
Site your stack, then build it right
Pick a storage spot for your boards that’s in the open, but avoid low, damp, or boggy areas. And, keep the stack from under trees that can litter it with twigs and leaves. On the other hand, don’t pick the sunniest spot in your yard, your boards might dry too rapidly. Keep wind direction in mind, too. The (prevailing) wind should blow through the side of the stack, not through an end. It’ll dry much quicker going through the side, and you won’t get as many end-checks.
Be sure to level the stack’s foundation, but provide for a slight drainage slope. Put down a vapor barrier if the ground seems damp.
Check the stack occasionally. Stains or mildew signal drying too slowly. Excessive checking means drying too fast.
A moisture meter is the most reliable means of determining moisture content. Check the wood every few weeks outdoors and after moving it indoors. Purchase a Moisture Meter
